


1. Format the separately prepared micro SD card (up to 128GB) to FAT32, then install the micro SD card into the camera.
2. Toggle the mode button to your desired recording mode. There are two recording modes: "L" for continuous recording and "M" for motion detection recording.
3. Turning on the camera and recording:
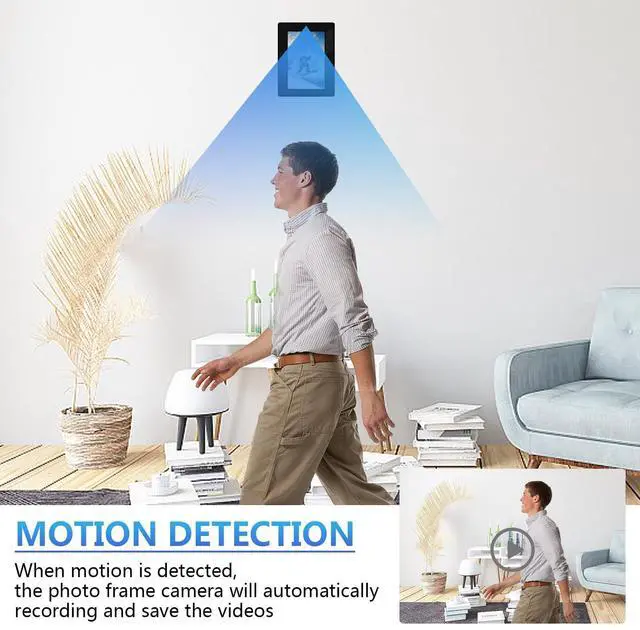
1) "M" Mode: Press and hold the power button for 3 seconds until the red and blue indicators light up. The device powers on. The blue light flashes 3 times and then turns off. When the sensor detects motion, the camera automatically begins recording. When the motion stops, the camera finishes recording the current video for 5 minutes and then ends. The blue indicator lights up and the camera returns to standby mode.
2) Press and hold the power button for 3 seconds until the red and blue lights remain solid. After 3 seconds, the red light flashes three times, and the camera automatically begins recording (no light flashes during recording). Press the camera button again to stop recording and save the data. The red light remains solid and the camera returns to standby mode. 4. In standby mode, press and hold the power button for 3 seconds. The red and blue lights will light up and then turn off, saving the current video file and shutting down the camera.
5. With the camera off, connect the camera to your computer using the included USB cable, or remove the micro SD card and connect it to your computer using a card reader (not included). Then, read the recorded video file.
6.Please watch the operation video on the details page for a more intuitive operation guide.

1. Use the AC adapter and provided USB cable to charge the Photo Frame in a wall outlet.
2. The RED light flashes slowly when charging.
3. When the camera is fully charged, the RED light stays on.
4. Generally, it takes 2-3 hours to fully charge.
5. After a full charge, the camera can operate continuously for approximately 3.5 hours in continuous video recording mode. In motion detection mode, this may extend to approximately 4 hours, depending on how much motion is detected.
6. The Spy Photo Frame must be fully charged the first time it is used to activate the battery's maximum memory. It supports working while charging.
7. The indicator does not display the charging status when operating the camera, but only the operating status of the camera.
1) This camera is not a WiFi version and does not support app connection.
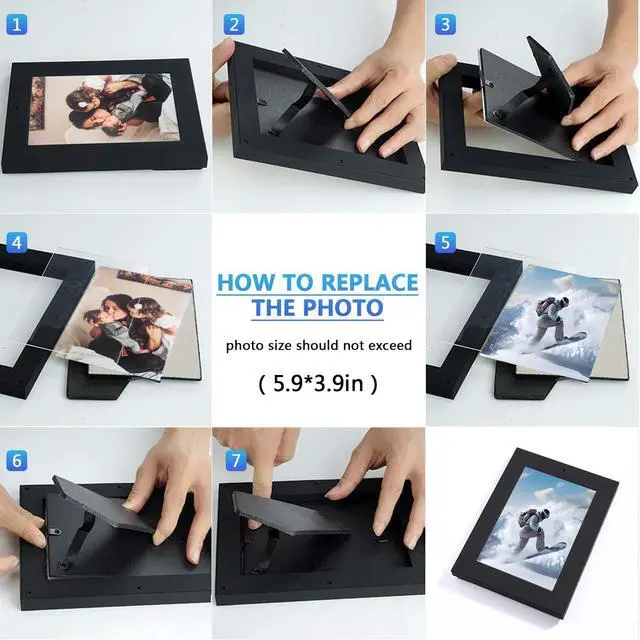
2) A micro SD card is not included in the package. Please prepare a separate one in advance to avoid affecting the use of the camera.
3) Always install or remove an SD card while the camera is turned off to prevent the camera from not recognizing the card.
4) Please install a micro SD card in advance; otherwise, the camera will not function properly.
5) Videos recorded by the camera are saved to the micro SD card and must be accessed on a computer to view the video. The camera does not provide real-time video.

1. Format the separately prepared micro SD card (up to 128GB) to FAT32, then install the micro SD card into the camera.
2. Toggle the mode button to your desired recording mode. There are two recording modes: "L" for continuous recording and "M" for motion detection recording.
3. Turning on the camera and recording:
1) "M" Mode: Press and hold the power button for 3 seconds until the red and blue indicators light up. The device powers on. The blue light flashes 3 times and then turns off. When the sensor detects motion, the camera automatically begins recording. When the motion stops, the camera finishes recording the current video for 5 minutes and then ends. The blue indicator lights up and the camera returns to standby mode.
2) Press and hold the power button for 3 seconds until the red and blue lights remain solid. After 3 seconds, the red light flashes three times, and the camera automatically begins recording (no light flashes during recording). Press the camera button again to stop recording and save the data. The red light remains solid and the camera returns to standby mode. 4. In standby mode, press and hold the power button for 3 seconds. The red and blue lights will light up and then turn off, saving the current video file and shutting down the camera.
5. With the camera off, connect the camera to your computer using the included USB cable, or remove the micro SD card and connect it to your computer using a card reader (not included). Then, read the recorded video file.
6.Please watch the operation video on the details page for a more intuitive operation guide.
1. Use the AC adapter and provided USB cable to charge the Photo Frame in a wall outlet.
2. The RED light flashes slowly when charging.
3. When the camera is fully charged, the RED light stays on.
4. Generally, it takes 2-3 hours to fully charge.
5. After a full charge, the camera can operate continuously for approximately 3.5 hours in continuous video recording mode. In motion detection mode, this may extend to approximately 4 hours, depending on how much motion is detected.
6. The Spy Photo Frame must be fully charged the first time it is used to activate the battery's maximum memory. It supports working while charging.
7. The indicator does not display the charging status when operating the camera, but only the operating status of the camera.
1) This camera is not a WiFi version and does not support app connection.
2) A micro SD card is not included in the package. Please prepare a separate one in advance to avoid affecting the use of the camera.
3) Always install or remove an SD card while the camera is turned off to prevent the camera from not recognizing the card.
4) Please install a micro SD card in advance; otherwise, the camera will not function properly.
5) Videos recorded by the camera are saved to the micro SD card and must be accessed on a computer to view the video. The camera does not provide real-time video.