
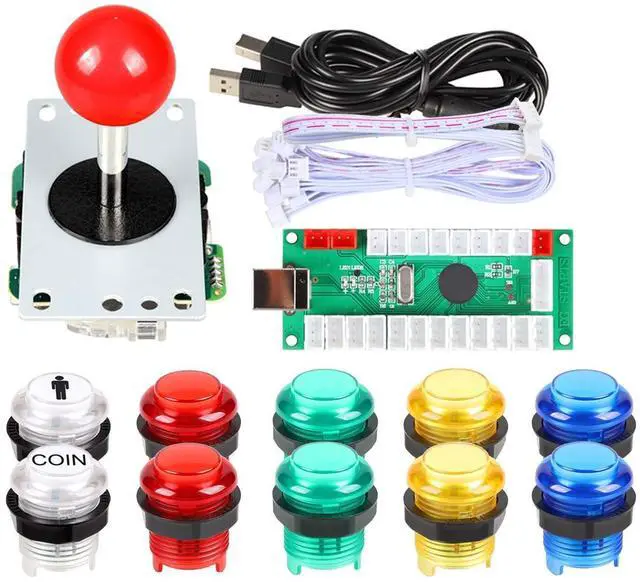
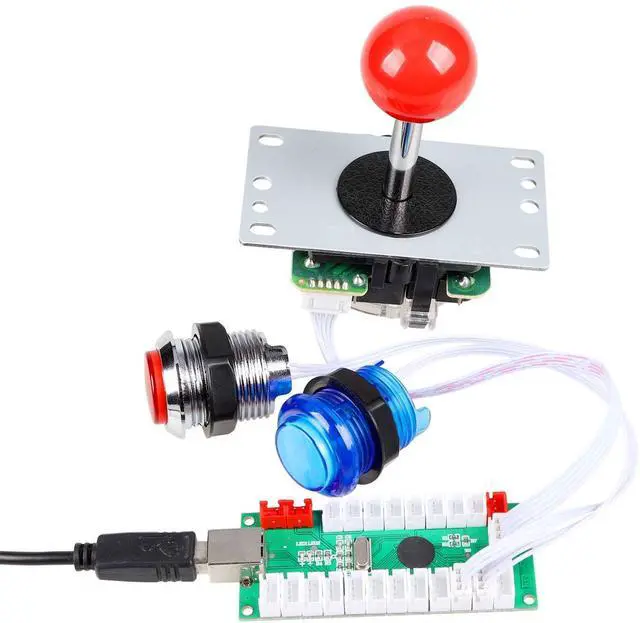


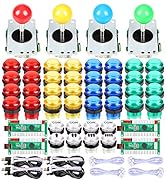
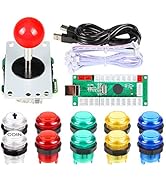
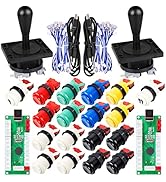
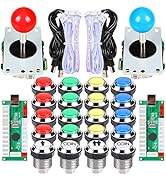
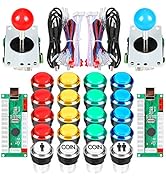
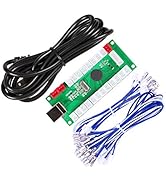
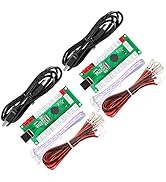
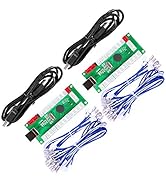
Product Description
1.Each Encoder have its own USB Cable to make sure that Multiplayer can play the games in the same condition!
2.The Joystick is a square 8 way professional joystick!
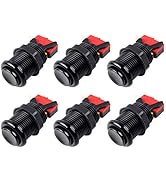
3.The buttons are Chrome 5V LED Illuminated push buttons with build-in Blue switch inside.
4.The buttons default as lighted all the time.
5.Joystick hole diameter: 24mm, large button hole diameter: 28-30mm
Package Included
1x Zero Delay LED USB Encoder
1x USB Cable
1x 5Pin wires for Joystick
10x 3Pin wires for LED Push Buttons
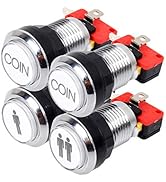
2x 5V LED 30mm Ring-Fixing LED White Push Buttons (1 Player + 2x Coin)
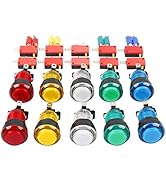
8x 5V LED 30mm Ring-Fixing LED Push Buttons (2x Red, 2x Yellow, 2x Blue, 2x Green)
1x 5Pin Square 8 way joystick
1x Install Description
Tips for installation
1. Plese read our user manual before starting your diy actions.
2. It's very important! Connect Joystick's 5Pin cable to the 5Pin slot that opposite the USB-B terminal. A lot people connect the joystick to the wrong 5Pin slot.
3. There is no need separate the button's functions when you connect wire to push buttons and encoder board exept you want add " Auto-Fire", " Tubro", "Clear" & " Mode" Functions. All the fight button functions can be set in MAME or RetroPie. "Auto-Fire", "Tubro","Clear" & "Mode" Functions have its own slot on the encoder board.
4. For Professional Players. We suggest your change all the buttons and joysticks into SANWA Brand or SEIMITSU Brand.
Tips for New User:
1. The item need work with MAME emulator. So before your build your own project, please download one to work with the parts.
2. If you use this kit to build your own Raspberry Pi Retropie Projects. Please search the steps before your DIY.


Wiring method
- Optimize the buttons interface mode
- Plug and play for easy plugging and unplugging
- Solve the wiring problem that plagues 90% of players.
- Let the player DIY become simple from now on.
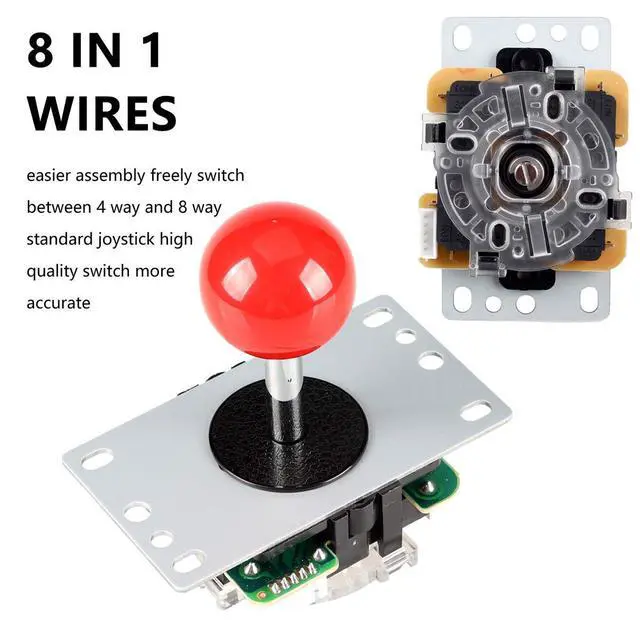
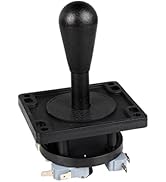
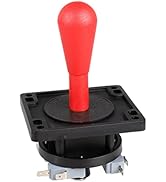
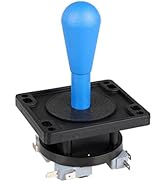
Arcade Joystick

Can replace the different ball
- It's hight quality 5Pin 8-ways joystick model. The service life reaches 1 million clicks.
- New interface mode. Reject the wrong interface.

Joystick bottom
- Applicable to the wooden shell and iron shell machine,
- The return of flexible, more wear-resistant; Iron base parallel cone; square gate.

Specification map
- All the silver conduction point, contact sensitive; within the iron bar for the stainless steel;
- 2.0 thickness of the electrolytic plate; dust washers; ball detachable, can replace the different ball;
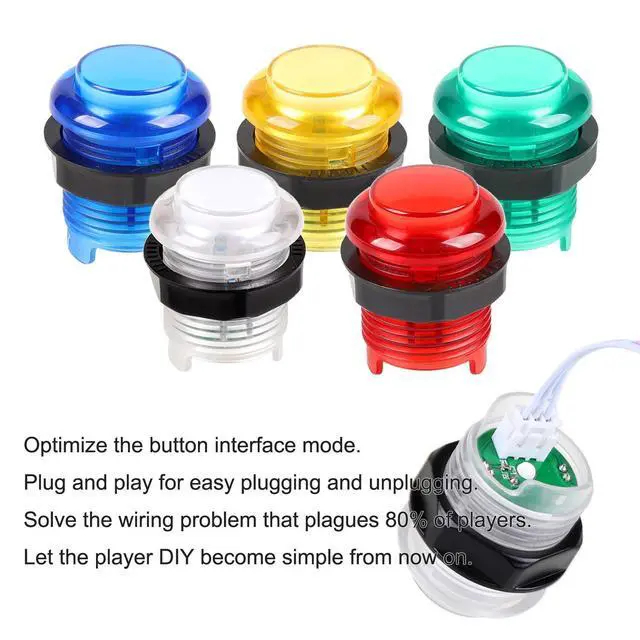
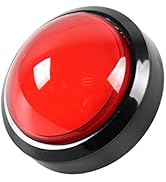
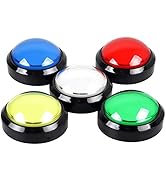
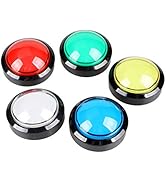
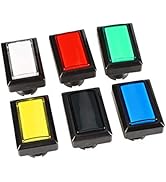
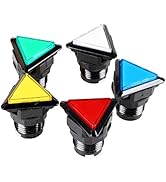
Arcade LED Push Buttons

New Version LED Buttons
- Individually independent stickers.
- Buttons can be opened separately to add brand LOGO. Create your own style.
- Each button has 3Pin Included switch and LED lights interfaces.

LED Lights
- High quality materials
- High temperature resistant plastic parts
- Body and translucent HD button cover
- Rotating design

Specification map
- Comes with lighting effects, can be used for wood console, metal panels, with the use of various types of animation game
- Plucked gold-plated, gold-plated contacts, micro-sound, long life, test life of up to 10 million times
- Use voltage: 5V
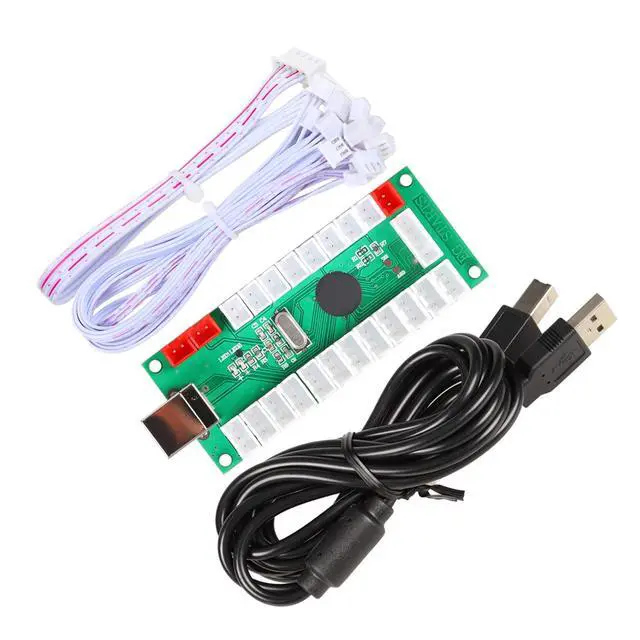
USB Controllers

USB Encoder
- The USB Cable: 87Inch
- The 5Pin Cable: 9.8 Inch
- The Buttons Cable: 9.8 Inch
- USB encoder imported SMD components. Work more smoothly. Longer life expectancy. Lower energy consumption.

Wiring method
- Optimize the Buttons interface mode.
- Plug and play for easy plugging and unplugging.
- Solve the wiring problem that plagues 80% of players.
- Let the player DIY become simple from now on

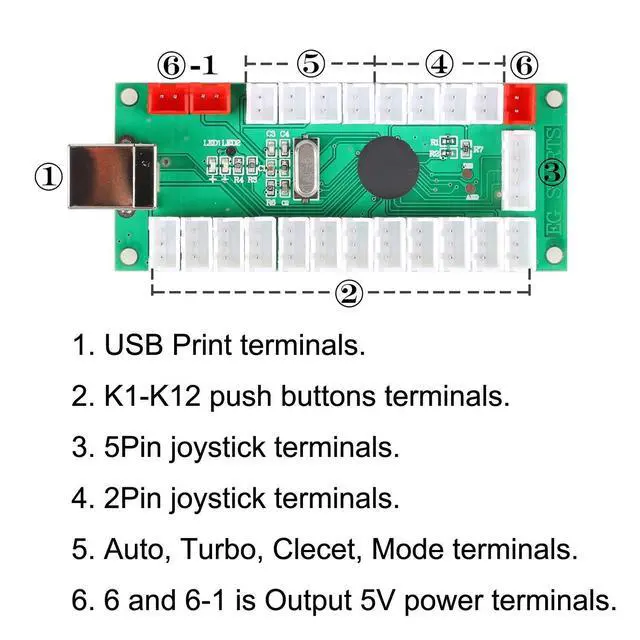
PCB Board
- USB Print Terminals
- K1-K12 Push Buttons Terminals
- 5Pin Joystick Terminals
- 2Pin Joystick Terminals
- Auto, Turbo, Clecet, Mode Terminals
- 6 and 6-1 is Output 5V Power Terminals

EG STARTS - Games Parts Stroe
Give you a happy gaming experience!
Your demands, our supplies; your satisfaction, our destination!

- We specialize in video game accessories, consumer electronics, visual simulation peripherals, meanwhile, we also provide you with very competitive wholesale prices
- If you have any questions, Please let us know and we will do our best to help you.
- Your needs, our supply; Your satisfaction, our destination!
- Please take a minute to leave us positive feedback with an overall detailed sales rating (DSR) of 5 Points

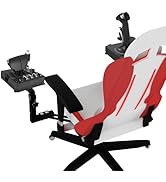

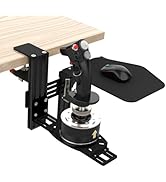
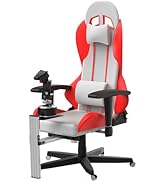
Chair Mount and Desk Mount
EG STARTS Arcade Games Kits

Arcade Joystick


2 Player Arcade Games Kits
Arcade Push Buttons
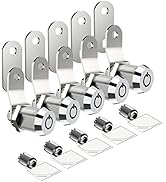

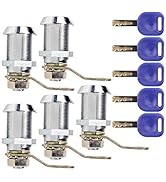
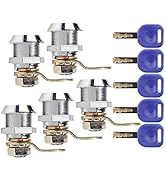
Cabinet & Furniture Locks

Arcade Push Buttons

Arcade Push Buttons
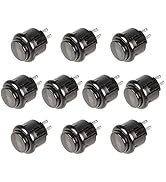
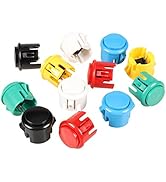
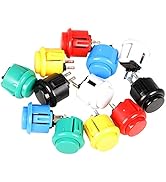

Arcade Push Buttons

Arcade USB Encoder
What make us start?
We noticed that there is a lack of products for games diy kit parts experiences such as fight games & flight simulator and Arcade games
We decided to change it. That is EG STARTS born for.
What makes our products unique?
in-depth research on video games product, pursuit of superior product quality,maximize the restoration of play the game experience.
What drives us keep moving forward?
What the game lover pursuit for is what EG STARTS pursuit.


EG STARTS - Games Parts Stroe
Give you a happy gaming experience!
Your demands, our supplies; your satisfaction, our destination!
- We specialize in video game accessories, consumer electronics, visual simulation peripherals, meanwhile, we also provide you with very competitive wholesale prices
- If you have any questions, Please let us know and we will do our best to help you.
- Your needs, our supply; Your satisfaction, our destination!
- Please take a minute to leave us positive feedback with an overall detailed sales rating (DSR) of 5 Points
Chair Mount and Desk Mount
EG STARTS Arcade Games Kits
Arcade Joystick
2 Player Arcade Games Kits
Arcade Push Buttons
Cabinet & Furniture Locks
Arcade Push Buttons
Arcade Push Buttons
Arcade Push Buttons
Arcade USB Encoder
What make us start?
We noticed that there is a lack of products for games diy kit parts experiences such as fight games & flight simulator and Arcade games
We decided to change it. That is EG STARTS born for.
What makes our products unique?
in-depth research on video games product, pursuit of superior product quality,maximize the restoration of play the game experience.
What drives us keep moving forward?
What the game lover pursuit for is what EG STARTS pursuit.
Product Description
1.Each Encoder have its own USB Cable to make sure that Multiplayer can play the games in the same condition!
2.The Joystick is a square 8 way professional joystick!
3.The buttons are Chrome 5V LED Illuminated push buttons with build-in Blue switch inside.
4.The buttons default as lighted all the time.
5.Joystick hole diameter: 24mm, large button hole diameter: 28-30mm
Package Included
1x Zero Delay LED USB Encoder
1x USB Cable
1x 5Pin wires for Joystick
10x 3Pin wires for LED Push Buttons
2x 5V LED 30mm Ring-Fixing LED White Push Buttons (1 Player + 2x Coin)
8x 5V LED 30mm Ring-Fixing LED Push Buttons (2x Red, 2x Yellow, 2x Blue, 2x Green)
1x 5Pin Square 8 way joystick
1x Install Description
Tips for installation
1. Plese read our user manual before starting your diy actions.
2. It's very important! Connect Joystick's 5Pin cable to the 5Pin slot that opposite the USB-B terminal. A lot people connect the joystick to the wrong 5Pin slot.
3. There is no need separate the button's functions when you connect wire to push buttons and encoder board exept you want add " Auto-Fire", " Tubro", "Clear" & " Mode" Functions. All the fight button functions can be set in MAME or RetroPie. "Auto-Fire", "Tubro","Clear" & "Mode" Functions have its own slot on the encoder board.
4. For Professional Players. We suggest your change all the buttons and joysticks into SANWA Brand or SEIMITSU Brand.
Tips for New User:
1. The item need work with MAME emulator. So before your build your own project, please download one to work with the parts.
2. If you use this kit to build your own Raspberry Pi Retropie Projects. Please search the steps before your DIY.
Wiring method
- Optimize the buttons interface mode
- Plug and play for easy plugging and unplugging
- Solve the wiring problem that plagues 90% of players.
- Let the player DIY become simple from now on.
Arcade Joystick
Can replace the different ball
- It's hight quality 5Pin 8-ways joystick model. The service life reaches 1 million clicks.
- New interface mode. Reject the wrong interface.
Joystick bottom
- Applicable to the wooden shell and iron shell machine,
- The return of flexible, more wear-resistant; Iron base parallel cone; square gate.
Specification map
- All the silver conduction point, contact sensitive; within the iron bar for the stainless steel;
- 2.0 thickness of the electrolytic plate; dust washers; ball detachable, can replace the different ball;
Arcade LED Push Buttons
New Version LED Buttons
- Individually independent stickers.
- Buttons can be opened separately to add brand LOGO. Create your own style.
- Each button has 3Pin Included switch and LED lights interfaces.
LED Lights
- High quality materials
- High temperature resistant plastic parts
- Body and translucent HD button cover
- Rotating design
Specification map
- Comes with lighting effects, can be used for wood console, metal panels, with the use of various types of animation game
- Plucked gold-plated, gold-plated contacts, micro-sound, long life, test life of up to 10 million times
- Use voltage: 5V
USB Controllers
USB Encoder
- The USB Cable: 87Inch
- The 5Pin Cable: 9.8 Inch
- The Buttons Cable: 9.8 Inch
- USB encoder imported SMD components. Work more smoothly. Longer life expectancy. Lower energy consumption.
Wiring method
- Optimize the Buttons interface mode.
- Plug and play for easy plugging and unplugging.
- Solve the wiring problem that plagues 80% of players.
- Let the player DIY become simple from now on
PCB Board
- USB Print Terminals
- K1-K12 Push Buttons Terminals
- 5Pin Joystick Terminals
- 2Pin Joystick Terminals
- Auto, Turbo, Clecet, Mode Terminals
- 6 and 6-1 is Output 5V Power Terminals